Pour-in-place rubber unitary surfaces have become the gold standard for public playground safety surfacing. These seamless, impact-absorbing surfaces provide excellent protection for children at play while offering durability and accessibility. However, like any playground surface, they can develop holes and damage over time that require prompt attention to maintain safety standards and extend the surface’s lifespan.
Understanding Pour-in-Place Rubber Playground Surfaces
Pour-in-place rubber surfaces consist of two distinct layers: a bottom layer of recycled rubber granules mixed with polyurethane binder, topped with a wear layer of EPDM (ethylene propylene diene monomer) rubber granules. This two-layer system provides both shock absorption and a smooth, colorful finish that meets ADA accessibility requirements while delivering critical fall height protection.
Common Causes of Holes in Playground Surfaces
Weather-Related Damage
Extreme temperature fluctuations cause the rubber surface to expand and contract repeatedly, potentially creating stress fractures that develop into holes. UV exposure from intense sunlight can degrade the polyurethane binder over time, making the surface more susceptible to damage. Heavy rainfall and freeze-thaw cycles can exacerbate existing weak points in the surface.
Heavy Usage and Impact Damage
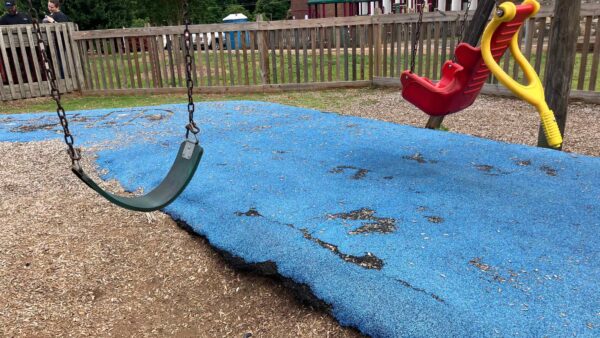
High-traffic areas around popular playground equipment often show the first signs of wear. Repeated impact from children jumping, running, and playing can gradually break down the binder, especially in zones directly beneath swings, slides, and climbing structures. Sharp objects dropped on the surface can puncture or gouge the rubber, creating entry points for further deterioration.
Installation and Substrate Issues
Poor initial installation can lead to premature surface failure. Inadequate surface preparation, improper mixing ratios of rubber and binder, or installation during unfavorable weather conditions can create weak spots that eventually become holes. An unstable or improperly graded substrate beneath the rubber surface can cause settling and cracking.
Chemical and Environmental Factors
Exposure to harsh cleaning chemicals, petroleum products, or other contaminants can weaken the polyurethane binder. Tree roots growing beneath the surface can create upward pressure that cracks and displaces the rubber. Additionally, poor drainage can lead to water pooling, which accelerates surface degradation.
Assessing the Damage Before Repair
Before beginning any repair work, conduct a thorough assessment of the damaged area. Measure the size and depth of holes to determine the appropriate repair method. Check for loose or crumbling edges around holes, which may indicate that the damage extends beyond the visible surface area. Document the damage with photographs for reference and to track recurring problem areas.
Test the surrounding surface for stability by pressing firmly around the hole’s perimeter. If the adjacent surface feels soft or spongy, the damage may require more extensive repair than initially apparent. Also, evaluate whether the hole extends through both the wear layer and base layer, as this will influence your repair approach.
Essential Tools and Materials for Repairs
Basic Repair Kit
Gather EPDM rubber granules that match your existing surface color, polyurethane binder compatible with your surface system, a mixing paddle or drill attachment, measuring containers for proper binder-to-granule ratios, and a notched trowel or smoothing tool. You’ll also need safety equipment including gloves, safety glasses, and appropriate respiratory protection.
Surface Preparation Tools
Have available a wire brush or power washer for cleaning, a utility knife for trimming loose edges, sandpaper or grinding tools for roughening smooth surfaces, and a shop vacuum for removing debris. A propane torch may be useful for drying surfaces in damp conditions, though use extreme caution.
Small Hole Repair Method
Cleaning and Preparation
Begin by thoroughly cleaning the damaged area and surrounding surface. Remove all loose rubber granules, dirt, debris, and any vegetation growing in or around the hole. Use a wire brush to roughen the edges of the hole, creating better adhesion for the patch material. Vacuum the area completely to ensure no loose particles remain.
Mixing and Application
Mix the EPDM granules with polyurethane binder according to manufacturer specifications, typically maintaining a ratio that ensures adequate binding without excess liquid. Work quickly, as most binders have limited working time once mixed. Apply the mixture slightly overfilled above the surrounding surface level, as it will compress and settle during curing.
Finishing Techniques
Use a trowel to smooth the patch, feathering the edges to blend seamlessly with the existing surface. Apply firm, consistent pressure to eliminate air pockets and ensure proper compaction. Allow the repair to cure according to manufacturer recommendations, typically 24-48 hours before allowing foot traffic.
Large Hole and Section Replacement
Advanced Preparation
For holes larger than six inches or areas with extensive damage, more intensive preparation is required. Cut out the damaged section in a regular shape, extending cuts into sound material to ensure clean edges. Remove all damaged material down to the substrate level, then clean and inspect the base for any underlying issues that contributed to the failure.
Layered Repair Process
When the base layer is damaged, rebuild it first using the appropriate base layer material and binder ratio. Allow this layer to cure partially before applying the wear layer. For the top layer, use the color-matched EPDM granules and ensure proper thickness to match the surrounding surface level.
Professional-Grade Repair Techniques
Hot-Applied Methods
Some repairs benefit from hot-applied techniques that improve binder flow and adhesion. These methods require specialized equipment and training but can provide superior long-term results, particularly for high-traffic areas or challenging repair conditions.
Preventive Reinforcement
Consider applying additional protection around repaired areas, such as installing edge strips or applying penetrating sealers to strengthen the surface. These proactive measures can extend repair life and prevent future damage in vulnerable locations.
Quality Control and Curing
Inspection Protocols
After completion, inspect repairs for proper adhesion, correct thickness, and smooth transitions to existing surfaces. Test the patch firmness and ensure no soft spots or irregularities exist. Check that the repair meets the required safety standards for impact attenuation and accessibility.
Curing Environment
Protect repairs during curing by restricting access and providing weather protection if necessary. Monitor temperature and humidity conditions, as extreme conditions can affect cure quality. Document completion dates and establish follow-up inspection schedules.
Preventive Maintenance Strategies
Regular Inspection Schedule
Implement monthly visual inspections to identify small problems before they become major repairs. Pay special attention to high-impact zones, drainage areas, and locations with heavy tree coverage. Early detection allows for less invasive and more cost-effective repairs.
Proactive Surface Care
Maintain proper drainage to prevent water accumulation, promptly remove debris and organic matter that can harbor moisture, and address any developing cracks or loose areas immediately. Regular cleaning with appropriate products helps maintain surface integrity and appearance.
When to Call Professional Contractors
While small repairs can often be handled in-house, certain situations require professional expertise. Contact qualified contractors when damage exceeds 25% of the total surface area, when substrate issues are suspected, or when repairs consistently fail in the same locations. Additionally, if your facility must maintain specific safety certifications, professional repair and testing may be required to ensure compliance.
Complex drainage problems, structural issues with the playground equipment foundation, or repairs requiring specialized testing equipment also warrant professional intervention.
Safety Considerations and Best Practices
Always prioritize safety during repair work by closing affected playground areas to public access, using appropriate personal protective equipment, and ensuring adequate ventilation when working with chemical binders. Follow all manufacturer safety guidelines and local regulations regarding surface modifications.
Maintain detailed records of all repairs, including materials used, weather conditions during installation, and subsequent performance. This documentation helps identify patterns and improve future maintenance strategies.
Conclusion
Proper maintenance and timely repair of pour-in-place rubber playground surfaces are essential for ensuring continued safety and maximizing surface lifespan. While many repairs can be accomplished with basic tools and materials, success depends on proper assessment, quality materials, and careful attention to preparation and curing procedures.
Disclaimer: The information provided in this guide is for educational purposes only and represents general maintenance concepts. Playground surface repair involves safety-critical infrastructure that directly impacts child welfare. Always consult with qualified playground safety professionals, certified installers, or surface manufacturers before undertaking any repair work. Local regulations, manufacturer warranties, and specific surface systems may require particular approaches or professional certification. When in doubt, prioritize safety and seek expert guidance to ensure repairs meet all applicable safety standards and local requirements.